5 Min Read
Building an OT Asset Inventory: How Mission Secure Does It
Written by Mission Secure

An accurate, up-to-date asset inventory is the foundation for all OT cybersecurity. Together with an OT network map, the asset inventory provides a comprehensive view of the industrial environment and is the starting point for risk evaluation, vulnerability management, policy development, and incident response strategies.
The asset inventory should contain as much information as possible about each device to facilitate informed decision-making about OT cybersecurity risks and policies. Some of the most common—and most useful—data points that need to be captured are listed below.
- Asset type: PLC, HMI, workstation, historian, etc.
- Manufacturer
- IP address
- MAC address
- Firmware version
- Operating system and version
- Installed applications
- Ports in use
Some of this information may already exist in paper files, spreadsheets, or IT asset management databases. In most cases, though, existing OT asset information is out of date and incomplete.
To create a complete OT asset inventory, organizations need to detect devices that are communicating on the OT network, as well as those that are attached to the network but not currently communicating. Many OT environments also contain “standalone” assets that are not attached to the network at all. In most cases it will be desirable to include these in the asset inventory as well.
Mission Secure uses a combination of techniques to build a complete, detail-rich asset inventory without disrupting OT network activity in the process. Here's how we do it:
Step 1: Passive listening
Passive listening is typically the first step in building an OT asset inventory. It involves listening to the traffic on the OT network and capturing the available data on assets that are communicating. The details gathered in this step include basic information such as each asset’s IP address, MAC address, and ports in use. It's often possible to derive additional detail such as device type, manufacturer, or firmware and OS version, but active querying (see below) is typically needed to fill in all the necessary details.
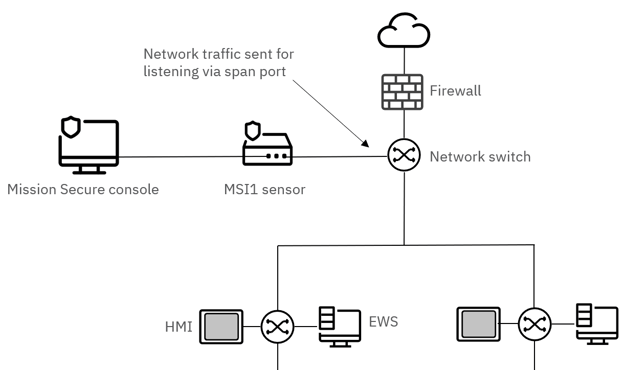
Passive listening can be facilitated by installing a Mission Secure MSI1 network sensor on a SPAN port at the highest-level network switch in the OT environment. Multiple sensors can be deployed as needed, based on the network architecture, and they will all work together with the Mission Secure console to generate a single, comprehensive asset list.
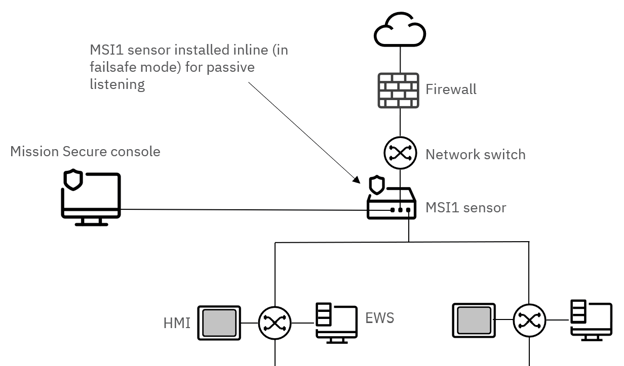
In some environments, passive listening can be more challenging–for example, if the network does not have a SPAN port available. In these cases, the Mission Secure sensor can be placed inline between the switch and the rest of the network. The sensor remains in a fully passive state and simply analyzes traffic as it flows through. A failsafe feature within the MSI1 ensures that data can continue to flow through the device even if it is damaged or experiences a power loss.
Typically, an organization will have a nearly-complete asset list within a few hours of deploying the Mission Secure platform. Then it’s time to fill in additional details on each asset and close any gaps that may remain in the inventory.
Step 2: Active querying
Passive listening almost never provides sufficient information to support effective vulnerability assessments or policy development. Active querying is typically needed to obtain additional information such as operating system, firmware version, installed applications, and other key details that are needed to evaluate an asset’s security posture.
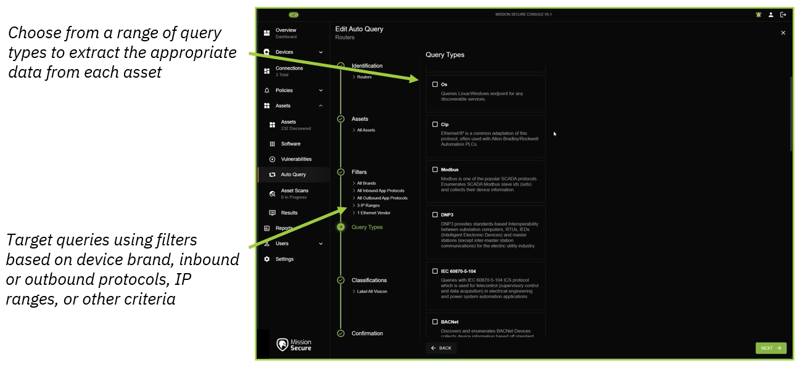
Mission Secure’s “auto-query” feature allows security teams to automate the active querying process and tune their queries for specific device types and manufacturers. Based on the protocols an OT asset is observed to be using (along with other factors defined by the organization), the Mission Secure console will send the asset a specific, properly-formatted request for information that will be the basis for risk assessment and policy enforcement.
Based on the information gathered through active querying, Mission Secure can automatically apply labels to indicate an asset's physical location, criticality, level in the Purdue architecture, or other details that help place the asset in the proper context. These labeling workflows are tailored to fit each organization's unique operational requirements.
Step 3 (optional): Targeted scanning
If an organization believes there may be devices attached to the OT network that aren’t being identified through passive listening or active querying, Mission Secure can conduct targeted scanning to find and identify “hidden” OT assets. In most cases this means assets that very rarely send or receive data over the network, and may not be discovered through passive listening, even after several weeks.
Network scanning, like active querying, must be carefully targeted to prevent operational disruption. Mission Secure asset scans are focused on specific IP addresses or network zones and are formatted to detect “hidden” assets without triggering alerts or hindering device functionality.
Step 4: Data enrichment
Once the OT asset inventory is complete, Mission Secure adds information from external sources as needed to enhance the organization’s understanding of its security posture.
The most important data to add to the asset inventory is information on known vulnerabilities associated with the devices, firmware, operating systems, and applications that exist in the organization’s OT environment. Using the information collected through passive listening and active querying, Mission Secure automatically updates each asset’s profile with CVE numbers, CVSS scores, and other relevant data points. This data can then be used in the development of alerting and segmentation policies.
Mission Secure can also import data from an organization’s existing asset management tools, streamlining the inventory process and providing a single source of truth for OT asset information. Users can also manually add labels to asset records to complement any labels that were applied during the active querying process.
Standalone OT assets
Many OT environments contain assets (or groups of assets) that are not connected to the broader OT network. These “standalone” assets are often invisible to operations and security teams unless someone is physically present near the assets.
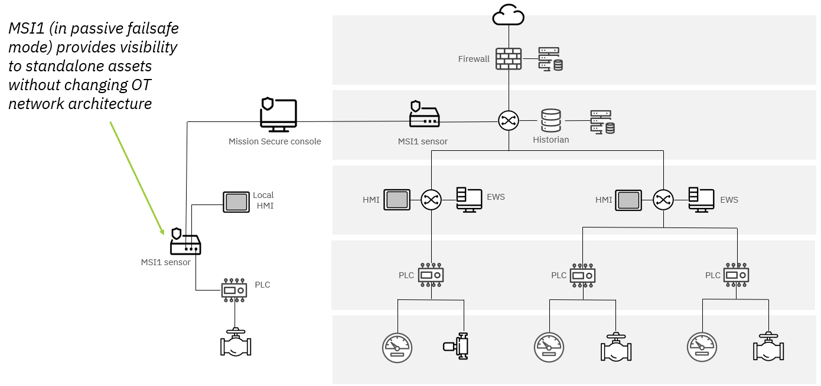
If an organization wants to maintain its current network architecture but gain visibility into standalone devices (and include the standalone devices in the OT asset inventory), Mission Secure can use its passive, inline monitoring capabilities to bring the assets into the console view.
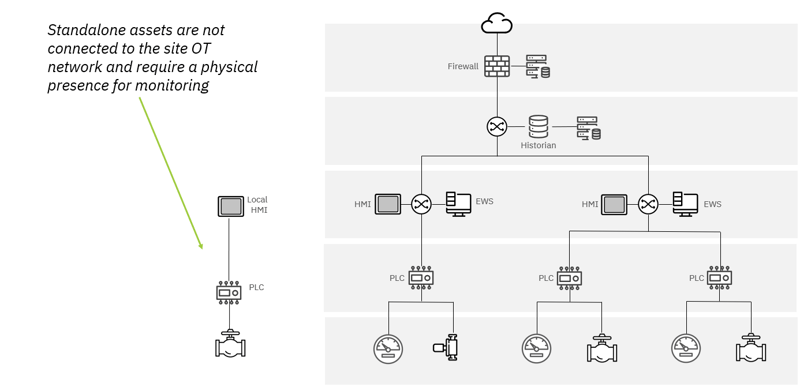
By deploying a Mission Secure MSI1 sensor alongside the standalone devices, the organization can include the devices in its asset inventory—and monitor for unusual activity that may indicate a user error or other risk—while maintaining the separation between the assets and the site network.
Visualizing the OT asset inventory
A complete OT asset inventory is a large, complex dataset. To make the information more usable for security and operations teams, Mission Secure provides several ways to view asset information.
Network map view
Based on the asset inventory and observed network activity, the Mission Secure console maintains a real-time map of the OT environment. Users can choose from multiple layouts (for example, a Purdue model layout) and can filter the map to show only assets that meet specific criteria.
Key data points such as device name, device type, and active alerts are typically displayed in the default map view. By clicking on any asset in the map, a user can view more detailed information on the asset, including IP address, MAC address, brand, OS and firmware version, CVSS rating, and any labels that have been applied.
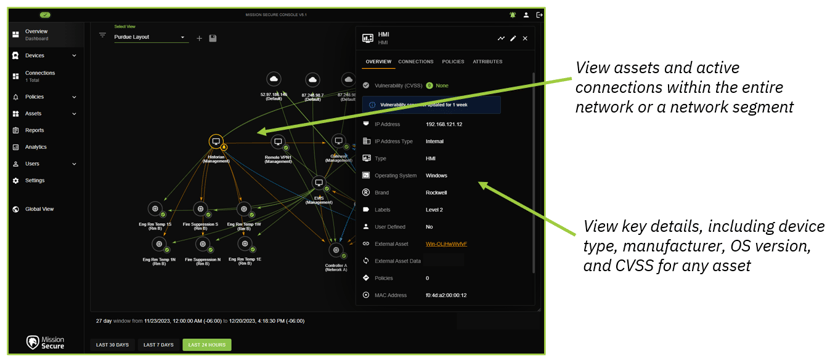
Organizations with large facilities or flat networks often have tens of thousands of assets in their inventory, which can make the network map a bit crowded. To address this, Mission Secure provides multiple options for filtering the map and for creating views that map only specific segments or network zones.
Asset table view
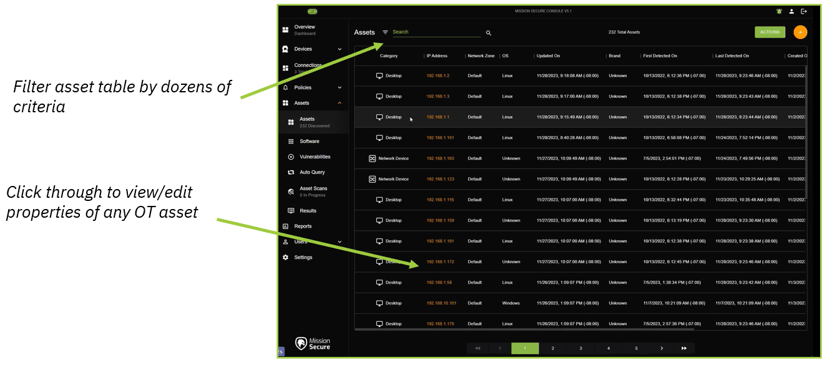
Users can also view their organization's asset inventory in a customizable table view, with options for filtering based on device type, manufacturer, IP address, or other criteria. As with the network map view, users can click through to view the full record for any OT asset, and inspect or modify the attributes associated with the asset.
Software inventory view
Mission Secure also gives security and operations teams the ability to view an inventory of all software discovered on the assets in their OT environment. This view is extremely useful for identifying unnecessary or unauthorized applications that could easily go undetected. Users can also use the software inventory view to make global edits to their asset inventories—for example, hiding records related to applications that have no relevance in cybersecurity workflows.
Next steps: putting the OT asset inventory to use
Of course, even the most comprehensive asset inventory is only a first step in securing critical systems against cyber threats. Mission Secure gives customers a wide range of tools to address the risks they uncover in the asset inventory process, from creating alerts to enforcing comprehensive Zero Trust policies across the OT environment.
To find out how Mission Secure can help your organization implement efficient, effective OT cybersecurity, fill out the contact form below, or schedule a consultation today.
Originally published December 20, 2023, updated December 22, 2023.


